Parents and Teachers
Teaching Tools & Ruhi Classes
Teachers’ Guides & Resources
Ten Clues for Cool Community Crafts

“Among the greatest of all great services is the education of children, and promotion of the various sciences, crafts and arts.” — ‘Abdu’l-Bahá
Providing opportunities for creative expression is a wonderful way to engage kids in Bahá’í community events and holy day celebrations. Gatherings are more fun and unifying when they appeal to people of all ages. And kids’ laughter and enthusiasm uplift those around them. Whether you’re working with two kids or 200, these tips can help you plan a memorable event.
1) Fit the activities to the setting.
Kids need room to spread out and work comfortably. Think about your space and the expected size of the group. Will participants be sitting or standing? How many tables are available? Consider covering furniture, work areas, and carpets with plastic or newspaper to protect them from supplies such as paint, glue, markers, and crayons.

Setting up a variety of craft activities at different stations is a popular approach that makes it easy for family and friends to assist younger kids. It also gives kids a chance to follow their own interests and curiosity (some will skip the beads and go straight to the modeling clay).
Wisconsin teacher Joy Starr says of an event she helped plan, “Families really enjoyed being able to be together in a creative space. Parents and grandparents had chances to connect with each other and spend quality time with their children and grandchildren.”
2) Keep it age appropriate.
Choosing age appropriate crafts is key. Kids’ artistic skills and attention vary widely with age. (Even kids of the same age have different levels of focus and interest.) Some projects can be simplified for younger kids, while options for embellishment can make them more stimulating for older kids. If preschoolers are involved, plan on helping them with things like tracing, cutting, and gluing.
Jessica Peer-Drake, an art educator in Florida, says, “When I’m planning a community event, I like projects that span a range of ages . . . Right now rock painting is huge! Look it up on Pinterest. It’s cheap and anyone can do it.”
Another helpful trick is to do some of the steps in advance, to save time and minimize kids’ frustration. Cut out paper, yarn, and other materials into appropriate sizes or shapes.
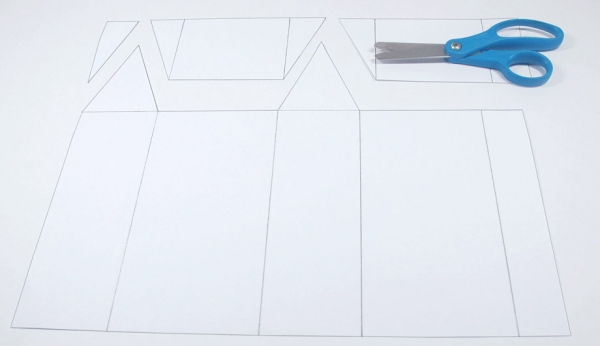
When the Brilliant Star team presents our Community of Light paper houses, we draw the house template ahead of time and hand out photocopies to get people started. For younger kids, we also cut out the templates and the decorative paper for the roofs.
3) Plan for the mess.
Even when tables and carpets are protected, there’s still an element of messiness with any craft (and that’s part of the fun!). If your project includes paint, make sure there’s enough time for it to dry before the group heads home. If kids are wearing nice clothes, offer large shirts or smocks to put over them.
Have bags or bins handy for scooping up paper scraps and other trash or recyclables. Stock up on cleaning wipes, paper towels, or washcloths to handle messy hands and work spaces.
4) Keep the instructions fairly simple.
Kids at a community event aren’t likely to read instructions on their own. If you offer craft stations, kids will arrive at different times, and an adult or youth will need to explain the steps. Make sure you have plenty of people around who know what to do and can explain it clearly—and repeatedly.
Be sure to have a few samples of the finished product on hand, so kids can get inspiration and see where they’re headed. If there are several steps, you can show the activity at a half-finished stage, as a visual aid.
When you’re giving verbal instructions, be sure to give them in the right sequence. Remember that preschoolers can absorb only three or four steps at a time. To be sure kids understand, you can ask them to repeat the instructions back to you.
5) Ask others to pitch in.
When one person handles all of the planning, shops for materials, sets up the event, and interacts with kids, an event can quickly get overwhelming. Joy says, “Planning to have multiple people bring projects and help to run their stations is one of the biggest successes of this year’s art area. We had about eight different volunteers bring projects, and many stayed to help children do them . . . Many hands make light work and add to the richness and diversity of the activities.”
6) Encourage individual creativity.
Cookie-cutter crafts are no fun. The excitement of art is for kids to express themselves and make a project that feels like their very own. Invite them to improvise and experiment. If their project is turning into something you don’t recognize, just relax and enjoy it, as long as they’re having fun.
7) Cheer kids through challenges.
If the cutting, folding, or project assembly get tricky for some kids, cheer them on. “Say encouraging comments to maintain motivation when kids get stuck or frustrated,” suggests Jessica. “A few words go a long way: ‘I like the colors you chose,’ ‘You really have an eye for this design,’ ‘That looks great,’ or ‘You’ve really made something special.’”
You may run into kids who just don’t want to do the project or who give up early. Respect their feelings. Look for ways they can help someone else or suggest an alternative activity.
8) Use diverse materials.
Art doesn’t have to be limited to paint and crayons. Materials in a variety of textures and shapes will spark kids’ interest. Jessica says, “Kids get enough gluing sequins on paper at school. I like projects that use random junk and nature, too. Mosaics are great! You can mosaic anything. If it can be glued, it can be tesserae.” (A great word for bits of stuff you glue into a mosaic.)
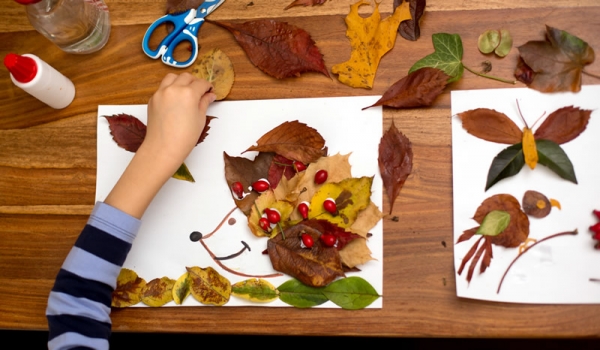
Joy says, “We also had many different types of media to work with. Natural materials that we had included flowers, herbs, and rocks. We also had projects that used popsicle sticks, yarn, painter’s tape, watercolor pencils, and much more.”
9) Invite kids to be inventive.
In addition to offering specific projects, presenting an assortment of colorful supplies in a “free art” area can be a welcome addition to your event. Kids can invent and express their individuality with things like clay, feathers, felt, magnets, paper bags, pipe cleaners, pompoms, rubber stamps and ink pads, stickers, and other items.
“I always think crafts are most appealing to kids when they are something that they haven't seen very often,” says teacher Mitra Paik of Wisconsin. “I try to be inspired by beauty and help the kids to have the same experience, and provide the materials for them to do that . . . Think glitter, jewels, gems, beads, decorative string, or wood to use for any theme.”
10) Take photos of the event.
It’s fun to look back on photos of kids and families in action. You can share them on your community website or through social media (be sure to ask people to sign release forms, giving you permission to share their photos). Your photos can also give you a helpful record of how you set up your event and who participated, which can aid in future planning.
We’d love to see your photos and hear your stories at Brilliant Star — send them to brilliant@usbnc.org, and we may share them online. Happy crafting!
For more resources, sign up for
Brilliant Star's Parents & Teachers Newsletter!
Updated on 9.01.17