Nur’s Nook—Inspired by Nature: Make a Sailboat

“All the existing arts and sciences were once hidden secrets of nature.”
–‘Abdu’l-Bahá (PUP)
Making arts and crafts really lights me up! But this week, I was having a hard time feeling radiant. No matter how long I sat at my art table, fresh ideas just wouldn’t flow. Then my dragonfly friend, Sky, invited me out to her neighborhood pond. As we flew around the colorful lilies, tall willow trees, and sparkling water, my imagination fired up!
It’s amazing how being in nature can inspire us. It reduces stress and helps us relax about things like time limits. Creative solutions are more likely to float along.
When I got home from the pond, I made this cool boat with items in my recycling bin. Check out the steps below to make your own sailboat. Then find a safe spot to set it afloat. Have fun exploring how nature inspires you.
You’ll Need: 7" (17.8 cm) round coated paper plate, scissors, ballpoint pen, ruler, stapler, 1½" x 4" (3.8 x 10.2 cm) cardboard tube, used plastic sandwich bag, packing tape, tacky glue, thick paper, decorative paper, wooden skewer, two 9" (22.9 cm) pieces of string, two ring-shaped candies, 5½" x 7½" (14 x 19.1 cm) flat cut-out or lid of used plastic food container. Optional: toy minifigures
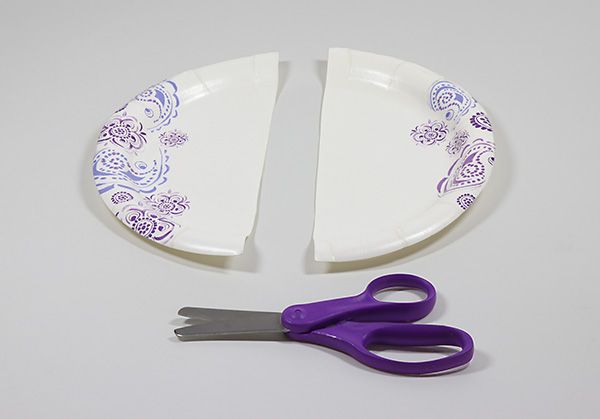
Step 1: Fold plate in half. Cut along crease.
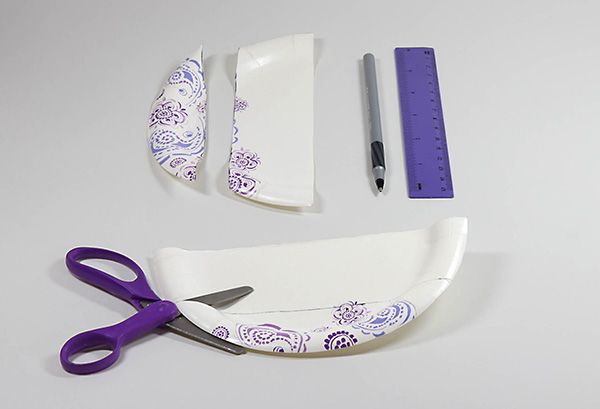
Step 2: Draw a line 2" (5.1 cm ) from straight edge of each portion. Cut along lines.
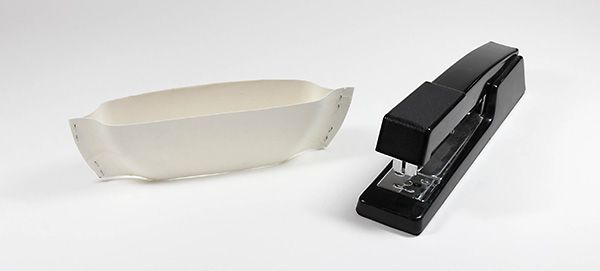
Step 3: Stack larger pieces of plate with coated sides facing each other. Staple top and bottom of each side so boat’s edges are even. Trim if needed.
Step 4: Wrap paper tube snugly inside sandwich bag and tape it closed.

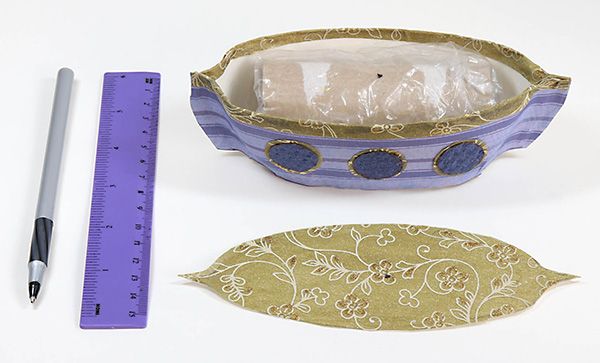
Step 5a: Push paper tube inside boat until its bottom is flat against table. Turn boat upside down on thick paper. Trace around boat and cut out shape for boat’s deck.

Step 5b: Glue decorative paper to deck and boat, leaving boat’s openings paper-free.

Step 6: Turn boat right side up. Use ruler and pen to make a dot at top center of paper tube. Repeat for deck. Push pen tip into each dot to create holes.
Step 7: For mast, push skewer through holes in deck and tube until it touches bottom of tube. Press deck evenly on paper tube so it’s snug inside boat and mast stands upright.

Step 8a: Cut out 3½" x 6" (8.9 x 15.2 cm) and 2" x 3" (5.1 x 7.6 cm) decorative paper rectangles, for sails. Trim so edges are curved.
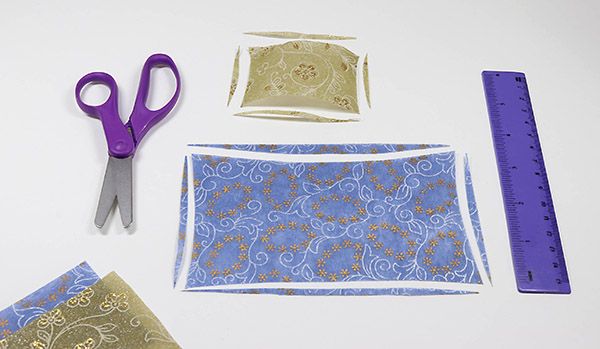
Step 8b: Press pen’s tip ¼" (.6 cm) from center of longer edges of each sail to make small holes. Thread mast through holes.
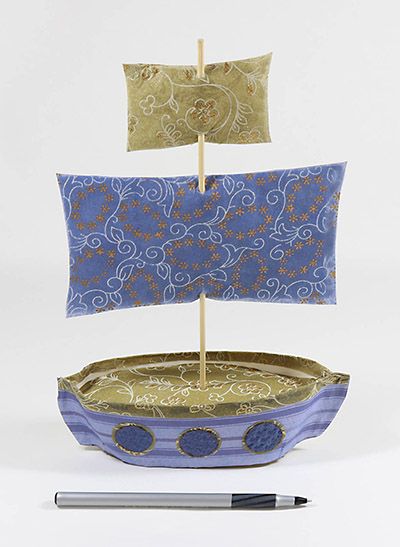
Step 9: Fold 1" x 3" (2.5 x 7.6 cm) decorative paper in half so short ends meet. From fold, cut off corners to make triangle for flag. Open flag and glue around mast’s tip.
Step 10: Thread string through candy and knot ends around mast. Repeat to hang a candy on other side for balance. Tape action figures in boat or create some mini-sailors with paper cut-outs. Tape or set boat on plastic lid and carefully balance it on calm water. Experiment with ways to keep it afloat.*

> FOOTNOTE:
*Clean up plastic and small parts from your craft that could harm water or wildlife.
For a printable version, download a PDF of this craft.
Characters493 Nur’s Nook100 Nur152 Crafts213 Arts & Crafts25 Ships16 Arts84 Artists22 Creativity296 Nature176 Inspiration18 Recycling34 Paper39 Imagination67 Play and Create797